Thanksgiving Table Runner Day 7 – Finish

I started this Sunday morning off by doing some last minute quilting

To prepare your table runner for the binding, you will want to trim the edges. I got as close as I could to a 2″ trim around the quilt top. You see, when you finish quilting, some of the seams won’t be exactly straight anymore, so with your ruler in hand, do your best to trim a little bit around the edge to make it straight and easy to apply the binding.

After you have trimmed your quilt top, it will be ready for the binding!

Grab up your 2 – 1/2″ binding strips and sew them together a special way. You will want to put two pieces together, right sides together, just like the picture, then sew a diagonal line as shown.

To make it easier, you might want to pin the strips together and mark your diagonal like for stitching. This will help to make the strips perfectly fitted together.

Then, press open the seam you just made, and if the pieces fit perfectly, as shown, then attach the remaining strips together the same way, checking to make sure that when you open the diagonal seam, that the edges are even on both strips.

When you are all finished stitching the binding strips together, and have pressed the seams open, you will want to trim the excess seams on the back of the strip.

Fold your binding strip in half and press, making sure the raw edges match up evenly.

Now it is time to put your binding on your quilted Table Runner! You will want to begin in the middle of the long side first. With raw edges together, place the beginning of the binding in the middle of a long side and pin it. Then, place another pin about 6-8″ from where the first pin is located in the middle of the long side of the quilt edge. That is where you want to “begin” stitching – 6-8″ from the beginning of the strip of binding. The reason is so that you can connect the two ends together neatly and perfectly when you have stitched the binding all the way around your quilt.

With a 1/4″ seam, stitch to “almost” the corner end of one side, then angle your stitching out to the corner as shown. What this does is it makes for a clean folded corner.

Make a right angle with your binding – a nice clean corner – then pin the corner and begin stitching down the next side.
Now for the tricky part … and for this, I am going to re-direct you to an earlier post I did on binding, that includes a video too! For that great post on binding, you want to go HERE

Now that you have your binding on the top of your quilt, you will want to press the binding open.

Then grab your favorite slippers, your needle and thread, a pair of scissors, and glasses. Head to your most comfortable place to sit and relax, and hand stitch the binding onto the back. Now, I know this sounds tedious, and you’d rather just sew the thing on, but believe me, not only does it look a million times better to hand stitch this last step, but it’ll make you feel all good and accomplished inside. Promise.

As you can see here, I took up residence in my favorite recliner by a roaring fire, and began stitching the binding onto the back of the quilt. Just fold it over, line it up about were you see the stitching from the other side, and do yourself a blind hem stitch (which, by the way, is taught in that little video in the link above!)

It’s going great! And I couldn’t be more comfortable, enjoying the holiday music and the fire and stitching on the binding and relaxing.

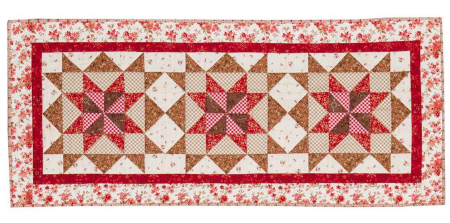
And here it is! All finished and ready for our Thanksgiving Table!

I am so proud of the way it turned out!

I even think it looks great on the back of Big Bear’s recliner!
Happy Thanksgiving!!