Thanksgiving Table Runner Day 6
It’s all about the batting …

You’ve finished piecing your table runner top! And now, you want to put the layers together and begin quilting! Begin by pressing the fabric you will be using for your quilt backing. This will prevent folds in the fabric while you are quilting your table runner.
Lay your quilt top on top of a layer of batting and backing. Make sure your backing is face down on your table, and your quilt top is face up as shown. Smooth out all three layers, then trim about 1-2 inches around the perimeter of the quilt top.

Your layers should look like this – all smoothed out with your hands, while the quilt is layered on your table. Next step is to hand baste your layers together. Personally, I prefer hand basting because it is fast and easy and holds all three layers together nicely while you are machine quilting. Table runners and small quilts are easy to machine quilt. Bed size quilts are a big problem to quilt by machine, especially if you are using a regular sewing machine as I am.

For basting your layers together, grab a thread that will stand out. You don’t have to be pretty when you baste. I make about 1″ basting stitches with a needle and thread. After you finish machine quilting, you can pull out the basting stitches with no problem.

When I hand baste, I do a criss-cross stitching pattern, then down each side. This holds all three layers together nicely.

Next step, you will want to start quilting! I start in the middle of the quilt and work down a seam to where it stops. Then, I turn the quilt around and stitch in the other direction down the next seam, and so on. That way, you are not pulling the fabric of the quilt always to one end or the other while stitching, as this could lead to a pinch or pleat in the top or backing. I hope that makes sense.
Secondly, if you are working on a regular machine, as I am, the arm may not be giving you a lot of room to work. As you can see here, I roll my quilt to fit under the arm of the machine. It makes it easier to control your quilt as well.

This is the back of the quilt. Not done quilting yet! But it looks really nice, and as you can see, there are no pinches in the backing fabric. That is why pressing the fabric before you baste, and basting is so important before you begin quilting.

Now, I’m going to share with you the mistake I made. Well, it wasn’t really a mistake, as much as it was an oversight. I pieced together the entire quilt top with red bobbin thread and red top thread. But after quilting the top on my machine, I didn’t like the red thread on top. Actually, I hated it. I thought it detracted from the quilt pattern. So, you guessed it, I grabbed my glasses, my scissors, my seam ripper, and a glass of sweet tea, and got to work ripping out all the quilting. I bet that gives you a headache just thinking about it, but consider this … I am also an artist in oils and pastels … and an amazing artist friend, Richard Schmid, once told me “Never intentionally leave something wrong in your painting. Never. Fix it as soon as you notice it, even if it means starting over.” As tough as it is to correct mistakes or things you don’t like, it is ultimately the best decision to correct them, rather than work around them, as soon as you find the mistake, or something you don’t like.
TIP: I took the seam ripper and snipped a stitch every 4-6 stitches on the back side of the quilt. It’s easier to begin ripping out seams on the side with one flat fabric, than on the side with the quilt top and all the seams from piecing together your quilt top. After you snip every few stitches in a row on the back, turn the quilt over, take your seam ripper, and starting at the top of the seam that was snipped on the back , pull the thread on the same seam on the quilt top. It will all rip right out. The whole dang thing. Other than cleaning up the snipped threads, the seam comes out fairly effortlessly, and before you know it, you’ve ripped out all the seams.
My hands, neck, and shoulders were hurting when I was done 6 hours later, but it was worth it. YES, it really was worth it. I’ll try not to be in such a hurry that I make that mistake again.

Back to the drawing board! As you can see, I am quilting using the method “Stitch-in-the-ditch,” and I have changed my top thread to a beige/cream color. MUCH BETTER!

It looks so much better! You can barely see the top stitching of the quilting now, and that is great. It doesn’t distract from the quilt design.
Tomorrow, I will be putting on the binding! And then Thursday … it will be on the table for a delicious and wonderful Thanksgiving with family.

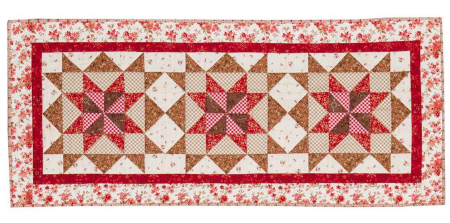
For those that don’t know, I am making the“Adelaide” table runner kit offered by “Connecting Threads” . This is a sew-a-long with me project. You can order your kit online, and when you get it, just pop on back here and we can sew together.